


Ethanol is one of the first organic compounds students are exposed to. They may be expected to learn about its structure and methods of producing it. Many modern specifications require that they understand the benefits and drawbacks of using it as an alternative fuel.
In this column last year I described how bottle rockets could be used to show an ethanol-air mixture driving a ‘vehicle’,1 but I often keep that demonstration for lessons on complete and incomplete combustion. When it comes to lessons studying ethanol itself, I like to have another demonstration to hand and one of the most impressive is the Cannon Fire experiment.
Kit
- Heat resistant mats to cover c.60 cm2 of desk
- A large evaporating basin (c.10 cm diameter)
- Eye protection for demonstrator and audience
- Safety screens
- 30 cm3 20 vol hydrogen peroxide (irritant)
- 20 cm3 ethanol (highly flammable) or IDA (industrial denatured alcohol, highly flammable, harmful)
- c.0.5 g potassium manganate(VII) (oxidising, harmful)
Preparation
Work in a well-ventilated area to avoid breathing the decomposition products during the demonstration. Protect the desk with heat resistant mats: I use four square 30 cm mats to make a 60 x 60 cm square. Place a fifth mat in the middle of the square as liquid can spill over the side of the basin and slip between the mats (the resulting stains are difficult to remove). Use safety screens to protect the audience and the demonstrator.
In front of the audience
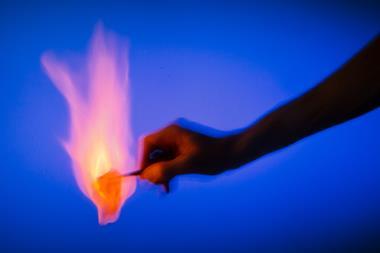
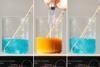
Load the evaporating basin with hydrogen peroxide and ethanol, then light it with a splint. The ethanol will burn with a pale blue, almost invisible flame.
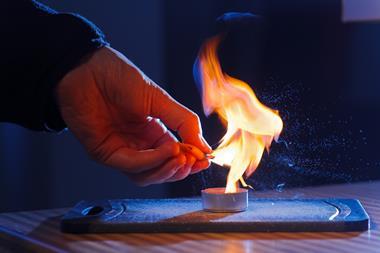
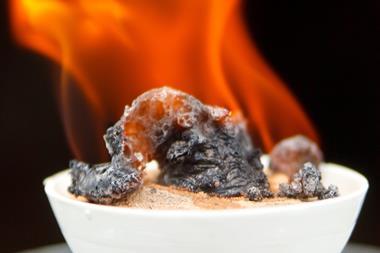
At arm’s length, add a spatula of potassium manganate(VII). The reaction will accelerate immediately as the manganate(VII) ions react with the hydrogen peroxide to evolve oxygen. A series of pops or bangs will follow and the height of the flame will shoot up. The reaction subsides after about a minute, leaving a colourless liquid and solid manganese dioxide.
Teaching goal
I normally use this demonstration purely for enthusing. It’s one of the few demonstrations I do that regularly receives a round of spontaneous applause from the students, perhaps because of the surprise factor.
Initially, it’s worth drawing students’ attention to the flame colour of the burning ethanol alone. The pale blue flame is very difficult to see. For this reason I like to take the time to remind them of occasions where I have insisted on removing ethanol from an experiment or demonstration before introducing a naked flame or after the flame has been extinguished!
If you are using this demonstration to support a lesson on the use of ethanol as a fuel, it is worth noting the different type of flame found compared to others they may have seen recently following fractional distillation practicals. The blue flame indicates a much cleaner burn: there are virtually no carbon particles to incandesce.
On addition of the potassium manganate(VII), the reaction is:
2MnO4–(aq) + 3H2 O2(aq)→ 2MnO2(s) + 2H2 O(l) + 3O2(g) + 2OH–(aq)
The flame will rise immediately and the lilac colour will reveal the presence of the potassium compound you have added. Rhythmic pops and bangs appear as the evolved oxygen accelerates the burning of the ethanol.
Although I wouldn’t normally use this demonstration while teaching reaction rates, it is worth noting how particle size plays a big role in this demonstration – larger potassium manganate(vii) crystals appear to produce more infrequent and louder explosions than smaller ones. Presumably, larger crystals take longer to produce an explosive mixture in a local diffusion-limited ‘pocket’ of vaporised fuel and oxygen. The smaller crystals will evolve gas faster and reach an explosive mixture more quickly, allowing only a small ‘pocket’ of gas to form. I would be the first to admit, however, that explosions resulting from heterogenous reactions are rarely as simple as they first appear!
Safety
Wear eye protection and use safety screens to protect both audience and demonstrator.
In some lighting conditions, the flame may be difficult to see. Do not repeat the demonstration in the same evaporating basin without first rinsing it out with tap water.
The coarseness of the potassium manganate(vii) can affect the reaction slightly with louder pops and fewer flames by using larger crystals. Do not be tempted to make the reaction more dramatic by adding more of any chemical or increasing the concentration of the peroxide.
This demonstration is unlikely to be covered by your employer’s model risk assessments, in which case a special risk assessment should be carried out. CLEAPSS members will find this on the website under Supplementary Risk Assessments, SRA 05.
Disposal: wash all liquids down a foul water drain with plenty of running water.
References
- Education in Chemistry, May 2013, p13 (Ethanol rockets)


No comments yet